![]()
![]()
![]()
How to Make a Wedding Cake
Hi everybody and welcome to a three-part series on how to bake a wedding cake. Today we will be covering the process of baking the cake and covering it in buttercream. In the subsequent articles, we will show you how to tear the cake, which is stacking it. The last segment will include some tips on how to decorate the wedding cake so it looks great in your wedding photos.
How to bake and wedding cake and frost it with homemade icing
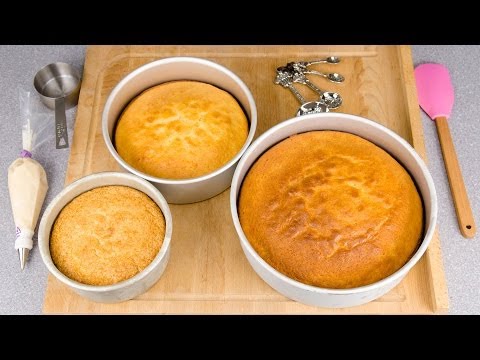
Let’s get started. So the first thing I’m going to talk to you about are the baking pans that we will use to make our three-tiered wedding cake. The big one at the bottom is a 10-inch round cake pan and that’s going to be our base. Our next or middle tier is going to be an 8 inch round cake and our top tier is going to be a 6 inch round cake.
Each of these cakes have to be baked two times, so when we’re finished, you’re going to have two 10 inches, two 8 inches and two 6 inches the wedding cakes layers.
Now let’s talk about heating cores. When you place them in the center of each of your pans, it kind of speeds up the baking time. You put a little bit of cake in the center of the heating core and you have the cake that pops out from the center of the heating core. I’m not going to be using that but I do want to tell you about it, because it is a handy thing to use especially when you’re making larger wedding cakes.
Now these bridal cake pans have straight sides which are something that you want to make sure that your cake pans have, so you don’t have any angles to your wedding cake. These ones are each 3 inches high and the cakes will be baking to be about a total of 2 inches in height.

We’re going to start the baking process next. We’re going to start out baking our 6 inch cake. For this cake you’re going to need 2 cups of batter per layer so in total for the top tier you’re going to need four cups of batter. Now I am using a homemade vanilla recipe which I’ll put a link in the description box for you but you can use any kind of cake that you choose.
You can also use a box mix if you prefer that as well, you just need to make sure your measurements are the same at two cups. I’m just taking some nonstick spray and I’m spraying my pan here and there. Then I’m putting a layer of wax paper in the bottom that just helps pop the cake out a lot easier when the cake is finished.
Next goes my batter and I’m going to be baking this one at to 350 degrees Fahrenheit. It will bake for about thirty minutes and then it should be nice and finished. I will have to repeat the process so I want you to make sure that you’re remember that you have to do two layers per size of cake pan.
Our next two layers will be the middle tier and it is the 8 inch. I’m spraying my pan and I’m going to be using three and a half cups of the cake batter per layer. It’s going to be baked for about 55 to 60 minutes at 350 degrees Fahrenheit. Once that’s done I’m going to pop it into the oven and we can start working on our largest tier which will be the bottom.
For the 10 inch layer we’re going to be using six cups of batter so in total we’re going to be using 12 cups of batter. I start by putting the wax paper at the bottom. BTW you can use parchment paper if you prefer. As this is the largest layer it’s obviously going to bake for a longer time.
We will be baking at 350 degrees and it’s going to bake for about 60 to 70 minutes. You just want to watch it to make sure that it’s completely finished in the center and it springs back to your touch. I’m going to pop that in and I’ll be back with all of the cooked cakes.

So all six of the cakes baked are ready. They’re nice and golden-brown. If you notice when you’ve been baking cakes that there’s a slight dome. In this case we are going to level each of them off.
We need to have our wedding cakes to be completely flat so they stay straight up. I’m going to level off my cakes using is a large cake knife. If you don’t have a wedding cake knife you can use a regular serrated blade, or just use a regular kitchen knife.
I’m keeping the blade level while turning the cake around here on my turntable. I’m just making sure that I’m using a sawing motion. You don’t want any part of the cake to tear. I’m going to repeat that for all six of the layers now.
Once our cakes are all leveled let’s talk about cake boards. The cake boards are essentially just cardboard pieces that are covered with foil. This one is quite thin it’s the 8-inch one that I’m going to be using for my 8-inch layer. This one is a six inch one and as you can see it fits perfectly on top of my six inch cake.
The last one is a bit larger and it’s actually called a cake drum. It’s thicker and it’s meant to be used on the bottom of tiered cakes. You can purchase them locally at any wedding cake stores or any major stores such as Michaels. This one I actually made myself. You just cut it out of cardboard and then you cover it with aluminum foil.

Next start covering the boards with buttercream and attach cakes with a little bit of icing. Just smooth that into the middle there like that and then put the cake in the center there of the board. You may notice that bottom one is a little bit bigger than the other eight and the six inch boards.
We want the base to be a little bit bigger because when transporting the cake you want some space for your fingers to be able to hold it. Now I’m just going to place the second one on top just like that and we repeat that process.
Once we have all three of tiers stacked on top we can do our crumb coat. A crumb coat is the initial layer of buttercream that goes on the cake. I’m probably going to be using about 12 to 18 cups of buttercream and I will put the link in the description box below to my vanilla buttercream recipe.
I’m just going to coat all three of these cakes in my initial crumb coat. After the crumb coat has caught all of the crumbs from the sides of the wedding cake we’re going to use more buttercream. We will cover it completely so I’m going to do all three of these different cakes and then we’ll be done with this beginning stage.
In the following segment we are going to cover how to stack the wedding cake, which we call tearing. And then it will be time for decorating the wedding cake.
Jane
How to Bake a Wedding Cake Recipes: 2x 6″ round cake pans 2x 8″ round cake pans 2x 10″ round cake pans Cake boards (6″, 8″, 12″) Vanilla cake batter (or any flavour that you prefer) Vanilla buttercream Wedding Cake Recipe Procedure: Preheat oven to 350F. Grease and line each pan with parchment, or wax paper. The 6″ pans will require 2 cups of batter each. The 8″ pans will require 3.5 cups of batter each. The 10″ pans will require 6 cups of batter each. Bake the 6″ pans in the oven for 25-30 minutes. Bake the 8″ pans in the oven for 35-40 minutes. Bake the 10″ pans in the oven for 55-60 minutes. Allow each to cool completely on a wire rack before proceeding to coat in buttercream. Attach one 6″ cake layer to the 6″ cake board, using a swipe of buttercream to “glue” it to the board. Cover the top of the cake with a layer of buttercream, and then place the second 6″ layer on top. Cover the whole cake in a crumb coat (thin layer) of buttercream. Repeat for the 8″ and 10″ cakes. When the crumb coat layer has crusted, you can apply the second and final layers of buttercream. Smooth the buttercream using a metal spatula.